Organizing Your Game Design Space

One aspect of game design that doesn’t get talked about a lot is organization. It’s possible that this has heightened importance since I live in a space-starved home in Vancouver, but I think all designers need to have a certain amount of organization. When you first start out making games, you purchase (or find!) the components you need for that game. But as you start to accumulate bits and pieces, you quickly realize that you need some sort of place to keep your components.

Often designers start out by using tool boxes or craft storage boxes as they both have many compartments to help you keep your differently shaped pieces separate. This makes it quite a bit easier when you need specific pieces – you can just go to that compartment and get what you need. These boxes also have another benefit – portability. If you find that you’re often going to other places to design games, then portability is going to be important to you. I only design at my home, and I’ve found that since we’re designing more and more games, my need to keep my components accessible has increased. So let’s take a look at the various ways I keep my stuff in order!

We’ll start with card sleeves. This is probable the most used component in all of game design for me. Often after a playtest that didn’t work, we have to totally change an entire card set – and instead of de-sleeving and re-sleeving, I have found that I have just made a new deck with new sleeves. This means that I get a pile-up of old prototypes that no longer work but are still consuming my sleeves. So every once in awhile I spend an hour or so de-sleeving all my old prototypes.

img_5020

Here are all the garbage old prototype cards that no longer need sleeves! You can see our prototype of Akrotiri and Orphan Black in here!

So then where do I put the sleeves? Well, I use a regular cardboard card organizer that one would use for Magic cards. I sort everything by colour which makes it easy to get what I want. One thing I do wish – I wish I only ever bought one brand of card sleeves. You can see that in some colours that there are many different groups. That’s because even though they’re all BLACK – they’re all a different BLACK! So I couldn’t use them in the same deck.

img_5019

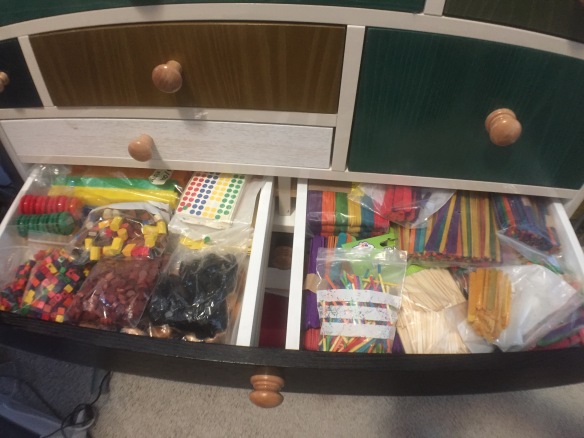
Next up is all my bits! I’m pretty lucky because I found this amazing piece of furniture at a store that was closing down. It’s looks beautiful and it’s amazingly functional for my needs.

img_5021

Each drawer holds some amazing goodies for a game designer. Let’s take a look at each row of drawers.

img_5022

The top left drawer is for coloured wooden discs and coloured wooden cubes. My supply of wooden cubes is ridiculously low. I’ll have to go get some more! They are very useful when you need to make your own dice for a prototype!

img_5023

The top right drawer is for bags (like dice or chit bags) and trays.

img_5035

The next row I have a small drawer just for sand timers and then a large but thin drawer for dice!

img_5036

The next row I have an empty drawer on the left due to my clean-out yesterday (so I’ve put what I always use as money in games…actual money!). The middle drawer is all my sharpies and other markers. The right drawer is all my cutting and glueing supplies.

img_5037

The left drawer is all plastic pieces like pawns, standees, gems and other plastic doodads. The middle drawer is wood! Large coloured wooden cubes, small cubes, square wooden tokens, circle wooden tokens. And the right drawer is colour sorted wooden bits. In here there are 6 separate containers – one for each colour – full of similarly shaped wooden bits that I got from Fantasy Flight. Then I stuffed a bag of wooden cubes in there as well.

img_5038

Cubes! Probably my second most used prototyping tool I use – coloured plastic cubes. I find it imperative that these cubes be sorted based on colour. It makes prototyping so much easier. Often I’ll be leaving for a game night and forget that I need X number of a specific colour – and I can quickly grab what I need. I change the size of the compartments based on how many cubes of each colour that I have.

img_5039

The small leftmost drawer is just for elastics! The middle drawer is for tools I use – like the Crop-o-dile that makes rivets so you can make dials. The right drawer is my meeple drawer – again sorted by colour.

img_5040

This is the hardest drawer to keep clean. This is my baggie drawer. Right now it’s perfect! I put baggies of the same size in a another baggie of that size – so it’s easy to grab the size you want. But it gets super messy when I put baggies back as I’m not often as diligent in putting them back in the baggie they came from!

img_5041

There are still more drawers? Yep! The one on the left is a bit of a mishmash of things. Some wooden bits and some plastic. Couldn’t find a more thematic place to fit these bits. The drawer on the right are all coloured sticks.

img_5042

OK this is the last drawer – I promise! The one on the left is all flat, round tokens. The one on the right is another mishmash of things.

So there you have it! That’s one way of keeping your bits organized. My drawers don’t always look this tidy as I just did a clean-out yesterday. It feels great to have all of these components at the ready. Makes prototyping a lot easier if I don’t have to leave my house to get a specific piece. The danger is that you start to buy components just because they’re cool and you think you’ll use them -for sure- in an upcoming game. There’s a fine balance to owning what you need and being prepared for the next game you’re going to make. I know I have a lot of things that I bought that I thought were cool – but I have never opened the package. I think I’ve settled down now though and am comfortable in how many components I have!

The third thing we have to keep organized is our prototypes. If you’re only working on one or two games at a time, then this isn’t as much of an issue. But Sen and I are often working on many games at one time – so we need a system. This is my system:

img_5043

I bought this drawer system from Ikea. The top three drawers are a bit thinner than the bottom three. Here’s how I use them:

img_5044

img_5045

The top 2 drawers are full of games that are ready to be play tested right now. I could grab any of these and take out to test. Once things have been tested, then the second drawer is the on-deck drawer if the prototype needs some tweaking before being tested again. Right now I haven’t been to a test night for awhile due to summer vacations and my teaching schedule so both the top two drawers are full of games ready for testing!!

img_5046

The third drawer is for games that are broken and need some more attention. We’re not too sure how to fix these ones – but they seemed close at one point!

img_5047

The next drawer is full of prototypes of games that have been signed or are being assessed by publishers right now. I keep them here until they come out because you never know if you will be asked to test another aspect of the game.

img_5048img_5049

The bottom two drawers are for games that we have currently abandoned. Some are super old but we have some games in here that are worth re-visiting from time to time. Often a game gets dumped in here if we can’t figure out how to make the game special and different. We have dug games out of these drawers and changed them up to make a totally new game later on! Never throw away a prototype!

So how do you keep your bits and pieces organized? Let me know in the comments below!

-Jay Cormier

How to get your game published: Simplified!

Today I am featured in the Metro News newspaper all across Canada! There are two articles in it, one about how board games are making a comeback and the other is about how to design and get your game published.

It’s quite a simplified version, compared to the 33 steps that I’ve outlined on this blog (See The Steps), but it’s perfect for the subway reading crowd! Check out the issue today if you’re out and about – or take a gander at the online version here:

Why board games are making a serious comeback

How to chute your way up the design ladder

Screen Shot 2013-08-02 at 3.21.55 PM


-Jay Cormier

Step 31: Working with a Developer

The contract has been signed, so now it’s time to sit back and wait until it hits the shelves right? Not quite. There’s still some work to do. Most publishers will spend some time developing the game even further. This is common and could last anywhere from a few weeks to a few months. The publisher might have a team of people that are responsible for developing the game or there might be just one person in charge of it.

So what happens during this stage? Well, the developer plays your game over and over again, trying to see if it’s fully balanced and retains what it had when they first agreed to publish it. The most common thing that will happen here is small tweaks. The cost of one card could be made more expensive as it proves to be too powerful in their tests; the quantity of resources given out might be changed for balance reasons. It could be bigger changes that range from adding or removing certain aspects or even changing the theme of the game!

A famous story is how Reiner Knizia’s game, Through the Desert started as a game about campers. The publisher liked it but wanted to change the theme to camels in a desert – and the rest is history.

We were fortunate for this stage so far as we were involved in all suggested changes. Most of them were fine by us, but once in a while we would share our thoughts on why we would disagree. Sometimes it was because we had tried that in an earlier prototype and found that it didn’t work in the long run for various reasons. Most, if not all of the time, the developer listened to what we had to say and took action because of what we said.

For example, at one point we suggested starting players with some resources, and while at first it was thought not necessary by the developer, we eventually playtested it and found that it sped the game up considerably. Alternatively, we always had a rule in there that you could sell your buildings for a certain amount of gold. Eventually the developer realized that hardly anyone ever did that, so it was better to just remove it which removes 1 option players have – which is fine in this game as there are plenty of other choices to be made!

Playtesting Belfort

For us, the developer process was lengthy for Belfort and almost non-existent for Train of Thought. Train of Thought is a party game and it didn’t require any changes at all. The only development for that game came with the rules editing. Belfort is a deep strategy game and the developer playtested the game numerous times over the 6 months. Every few weeks we’d get some new reports on how the latest playtests were going. We communicated using an online forum since we were all located in various parts of North America.

It’s key in this stage to maintain a positive attitude and a humble demeanour. You don’t want to get on the publisher’s bad side at this stage. If you want a reputation, then get one that is about how easy it was to work with you as a designer. That isn’t to say that you should just lay down and accept everything they suggest. We chose our battles wisely and only really stuck to our guns if it negatively impacted gameplay. This should be one of the most fun times for you as a designer, so don’t spoil it!

-Jay Cormier

When not creating games by night, I’m a mild-mannered pediatric Occupational Therapist by day. In my line of work, I constantly tell parents that a huge percentage of the problems they or their children are experiencing could benefit from improved communication. And the same goes for working with a developer – fostering an open and understanding dialog is key to ending up with a result that everyone can be happy with and proud of.

Because Jay and I work as a team though, painfully separated by huge tracts of land, we have become somewhat experts in communicating with each other. For the most part, we are able to get our points across without ripping each other’s throats out. Having access to modern technology like Skype and our forum has really enabled Jay and I to be able to do our work despite the 3-hour time difference. We have become fairly adept at putting our ideas into writing, making physical prototypes and working things out from a distance. Giving and receiving feedback with our colleagues from the Game Artisans of Canada and our playtest teams has been hugely beneficial as well. All of these skills have been definite assets when it came to working with Seth Jaffee, our Developer on both Train of Thought and Belfort.

So, working with a developer is no different than working with anyone else – communication is a game. Everyone playing just needs to know the rules, the boundaries, and share a common lingo.

The Rules:

What I mean by this is not necessarily the rules of the game itself (though you should know those like the back of your hand, I hope!) but the “rules of engagement”, as it were. Questions you need to answer may include: Who’s in charge of what? Who’s tasked to what? Who’s the final decision maker? What is the purpose of this iteration cycle? Arming yourself with this knowledge can help you avoid some of the common misadventures that happen with groupwork – Going It Alone, Reinventing the Wheel, Passing the Buck, and the ever-dreaded Stepping On Toes.

The Boundaries:

Fact 1: You are designer of the game. So it’s your baby.
Fact 2: You have signed away your rights to the game. So it’s basically been “adopted”.

This means that you need to understand a few things, like it’s the publisher’s call whether or not the game needs to be rethemed. It’s the publisher’s call whether or not there are too many cards in Deck A, B *and* C. And, thus, by proxy, it’s the developer’s call as he/she has been employed by the publisher to take the game and make it better suit the publisher. You need to be aware going into this relationship that the developer is not there to work for you. He has a different agenda. It’s more than likely 99.9% parallel to yours, but you’ll note that I used the word “parallel” as opposed to “same”. He may have the task of ensuring that there is the least amount of language on the cards, for example, which requires you to review how the rules work with only icons. Your agendas need not clash – in the end, all parties just want to make a good game. But it takes an understanding on all sides of the die that everyone knows what’s up.

Speaking of which, one boundary that you, as the designer, may wish to discuss with the publisher and developer is your overall vision for the game – what were you trying to accomplish when you made the game? What are some of the high priority “no sale”, make-or-break items for you? If the developer holds these in mind while he is doing his thang, everything will flow from those overarching elements. It’s important to look at the game from the macro viewpoint every now and then to ensure that the wholistic nature of the game is still intact after all of the micro changes that are made. But without talking about that kind of stuff, how is the developer supposed to know? He’s not a mind-reader anymore than you are.

Share a Common Lingo

This, simply put, means that everyone is on the same page language and terminology-wise. You will save yourself a lot of confusion and arguments if everyone knows that when you say SP you’re referring to Skill Points, not Spell Points. Having very clear rules with well-layed out phases of play and a glossary of terms can really help everyone understand each other. When everyone speaks the same language, the flow of ideas is much more seamless. It helps streamline conversations when people can refer to the same points of reference instead of having to call something the “the-part-of-the-game-where-we-roll-dice-and-move-things-but-we-don’t-pick-up-any-cards-because-that-comes-at-the-end phase” (er…you mean “The Movement Phase”).

So keep the lines open between you, the developer, and the publisher. In the end, change is generally for the positive – i.e. to make the game better (in terms of playability, saleability, etc.). Be open and accepting to feedback, because if the agendas are parallel, everyone is hoping to get to the same place. So embrace change instead of fighting it, just ask for clarification/explanation from the developer if needed.

In short, communicate.

-Sen-Foong Lim

Semi-Finalists in the Canadian Game Design Contest!

Sen and I made it into the Semi-Finals for the Canadian Game Design Contest with our game, Akrotiri! This is the second year in a row where we made it into the Semi-Finals for this contest, with Jam Slam making it in last year (and ultimately not winning).  The next step is to make two prototypes and mail them off so they can play them! So far everything has been based on just the rule book.

The winners will be announced at this year’s FallCon in Calgary. Stay tuned! Here is the list of everyone who made the Semi-Finals:

Akrotiri (Jay Cormier & Sen-Foong Lim)
Ciceron (Jérôme Morin-Drouin)
Coven (Paul Saxberg)
Potlatch Dice (Yves (Etienne) Tourigny)
That Flipping Property Game (Alan Biggs)
The Market at Kos (Doug Meldrum)
Undermining (Matt Tolman)
Yum: Realtime Icecream (Gavan Brown)

Congrats to all!

Here’s a video where they review the process and then announce the winner of last year’s contest (which was a fellow Game Artisan of Canada, Roberta Taylor!):

Design Tip: Simple versus Clean

What’s the difference between a simple game and a clean game?  A simple game has reduced decisions and strategy and a clean game can be any game that is streamlined where everything fits and makes sense and has no extraneous rules or pieces.

This concept took Sen and I awhile to understand actually.  We could easily recognize when one of our games was messy and convoluted, but would often think that the solution would be that we should make it simpler.  In the end we would end up with a very basic – but still messy game!

Let’s look at the difference of each by using some examples from one of our games in progress: Akrotiri.

In Akrotiri, part of the game has players moving their boats from island to island picking up resources and then shipping them back to Akrotiri to sell them.  Seems easy enough, but we were continually challenged with how to determine the prices of how much Akrotiri would buy these resources from players.

The Simple way to do it would be to set a fixed price and say that every resource is sold for 1 gold.  That’s just too simple and offers no strategy and cannot be affected by a player’s choice at all.

Our initial idea was to use a stock market to track each resource’s value.  Every time a resource is added to the board then the stock market goes up by one.  If a resource is sold to Akrotiri then the market goes down by one for that resource.  Seems like it makes sense, but it wasn’t clean.  Why not?  Because players would often forget to change the market when either adding a resource or selling to Akrotiri.  It was messy and caused players to say things like, “oh I sold that resource last turn but forgot to lower the price – so it should be 2 steps lower.”  Not a good gaming experience.

We toyed around with some other ideas before coming back to this stock market idea.  This time we placed all the resources on the market itself.  If a resource is added to the board then it is taken directly from the stock market.  When it is sold back to Akrotiri then it is placed back on the stock market tracker and the player gets the amount that it is placed onto.  Now that’s a lot cleaner.  Now players can’t forget to affect the market.

So when designing your games try to be objective and determine if it’s simple or clean, and unless you’re making a game for children, lean towards clean!

-Jay Cormier

First off, thanks to Sean of the G.A.C. (Game Artisans of Canada – a group of designers that Jay and I belong to) for his assistance with coming up with the current stock market mechanism. Secondly, there’s nothing more rewarding than coming up with creative solutions to a problem that doesn’t increase the analysis paralysis or downtime – and that’s the difference, for me anyway, between a simple game and a clean game. Though, personally, I prefer referring to them as “simplistic” vs. “elegant”. Semantics, I know. To me, “elegant” means also linking multiple mechanics in the same game to affect the outcome as a whole.

To me, a simplistic game can be made by reducing the rules and components until you’re left with the most basic elements of the game. There is very little interaction on the board or between players. Think of a classic “roll and move” game like ‘Snakes & Ladders’ – you roll, you move, the board tells you if there’s a penalty or a bonus based on the square you land on. Two players never interact. First one to the end wins.

An elegant game, to the contrary, may have some very simple mechanics (and, in fact, works better if it is made up of primarily simple mechanics) but the complexity is built into how those mechanics interact. How the board, the pieces, and the players interact with each other all form a meld of complexity. The art, here, is making it as seamless as possible – hence elegant. It should, at the best of times, come off smoothly without much down time or referring to charts or manuals. It should be minimal in execution, but maximal in effect. Think of something as simple as the event die in ‘Settlers of Catan’ 2-player card game – roll a die and something happens. The elegant part of this was that both players were affected by this die roll on either player’s turn, but not necessarily in the same way, depending on the buildings they had, the resources they stockpiled, their contingency of warriors, etc. It was a simple roll with simple rules to effect each result (compare who has the most red points in knights – that player gets a benefit) and both players took part in the event phase, even on the other player’s turn which keeps things interesting. And the result of the roll can be more or less beneficial depending on how well a player planned in his or her previous turn. Almost zero downtime for a ton more effect in the game. Definitely a worthwhile trade-off if you were to do a cost/benefit analysis.

Both the ‘Snakes and Ladders’ and ‘Settlers of Catan Card Game’ example use a single die as the mechanism. The difference is in the ramifications of the die roll. One is simplistic, the other is far more elegant.

-Sen-Foong Lim


Design Tip: Constraints are Good

About 3 years ago I mentioned to Sen that I thought it would be a cool idea if we came up with a super small game that we could include in a letter to publishers as a ‘free’ gift when submitting other games.  For some reason I thought this would be really neat and make us stand out.  I set to work on a tile placement game about trying to have more of your houses in a neighbourhood than your opponent.  I managed to get the game down to 25 tiles.  I made a small little matchbox-like package for it and viola – we had a really cool pocket game! (I’m glossing over the fact that it took more than a few stabs at the game until we got it to its final state).

Hot Property Game Design

Hot Property: our first game using our self-imposed 25 tile limit

Once that was done, I was feeling pretty motivated about how we got a Euro-style game to fit within 25 tiles.  It got me thinking and I remember for one 5 hour flight from Toronto to Vancouver, I brainstormed all the different genres of games and then tried to see if I could come up with a way to make it using only 25 tiles.  At the end of that flight I had ideas for 11 games!

The benefit of reducing an entire game into 25 tiles, is that you’re forced to eliminate anything extraneous which ensures the cleanest and simplest of rules. Some of these games that we made were pretty minor and didn’t have much fun to them, but others had a gem of an idea in it that were not only fun but enabled us to turn them into bigger full-fledged games.

Belfort, our game that is coming out early next year, started as a game that had only 25 tiles.  Hard to believe when you see the final game that it started out as only 25 tiles! Some tiles were used to track how many resources each player had (by rotating the tile so that a specific number was facing up), and the other tiles were buildings that players could build.  The first time I played it with Sen, I was excited to show him how we were able to get a resource management game to fit within 25 tiles!

As soon as Sen finished playing it he said that he really liked it, but that it begged to be a bigger game!  We spent the rest of the weekend turning it into the first prototype of the game that was to eventually be known as Belfort (it was called Castletown back then!).

Other smaller, 25-tile games we have made that we eventually turned into larger games have been Akrotiri – a pick up and deliver game, and Lost for Words – a word search/creation game.  Both of these games are almost ready to be shown to publishers right now.  There’s even a couple more games (EIEIO – a quick reflex party game and This Town Aint Big Enough for the 2-4 of Us – and area majority game) that we’re thinking of converting to bigger games as well.

This was just our way of motivating our creativity, but you could use other constraints as well.  Try making a game using only dice and face cards from a deck of cards; or a game using only a checkerboard and 10 custom cards; or a game using coloured cubes and a piece of paper…you get the idea.  Try to make the most basic game using only a couple basic items and you might find yourself with either some new ideas or a really interesting concept for a bigger game.

-Jay Cormier

I am, by nature, an extremely divergent thinker. This is really just a polite term for “tangential”, or, as my wife would say, “focus-challenged”. Personally, I prefer “free-thinker”. I’m the kind of guy who has what could be only be termed as “chronic creative diarrhea”, constantly coming up with idea after idea after idea. I spend a lot of time coming up with all the cool things that could possibly work together in the game, invariably ending up with a mashed-up monstrosity, and then I have to spend even MORE time cleaning up the mess I’ve made of what had started out as an interesting game.

Enter self-imposed constraints. By placing limits on ourselves, Jay and I can steer clear of thematic traps more easily (i.e. adding something for the sake of making the game fit a specific theme better), minimize cost of fabrication, and reduce the time from it takes to get a game from a “brain fart” to the prototype stage.

This last point is the most important to me, as I am admittedly the kind of designer who would spend eternity tweaking things in my mind before ever committing anything to a physical format if you let me. But by saying “Hey! We’ve reached the 25 cards limit – time to print and cut!”, we can get to the most crucial part of the game design process faster playtesting. While I am good at recognizing strengths and flaws in game systems in my head, I can’t account for everything once the number of variables gets unwieldy and I can’t account for how different personalities will interact with the game. The physical components themselves can also change how a game is played. And to realize that, the game has to be made a reality.

These small games are simple by nature so they the rules are quick to teach and easy to pick up. The set up time is minimal and the games themselves take only minutes to play at the most, so many rounds of play can be racked up in a short timespan. Thus, we can accumulate valuable data on actual playtesting by other playtesters. Jay and I are then in a better position to analyze the game as opposed to doing all of the guess work in our heads. This allows us to prioritize which ideas need to be expanded up immediately, which worked but can sit and wait, and which are never to be heard of again (except, for some reason, on this blog…).

Of course, this design ethic doesn’t work for every game and not every game we make starts off this way. Some games aren’t going to fit within 25 cards straight from conception. “Train of Thought” and “But Wait, There’s More”, both word-based party games, were designed without the 25-card limitation because, really, how fun would a word game be with only 25 different words available to use?

We’re currently designing a trick-taking game called “Lions Share”. We’ve limited ourselves to 55/110 or 60/120 cards in this case. Those limits are actual real-world constraints we’re using to ensure that publishers will look at the game without production reservations. The maximum number of cards that can be made on a single sheet of stock of standard dimensions is 55 by Imperial measurements or 60 by the Metric system. Going over those limits will actually affect the bottom line for the publishers, so having 60 cards in a game can be more appealing to many of them than needing 68 cards, even if the 68-card version is a better game. Using non-standard card sizes is costly as well as a custom die needs to be created. So, whenever possible, stick to 55 or 60 cards in a deck (or multiples thereof).

We’re also trying to solely use cards for “Lions Share”. This constraint was put on in response to the fact that a lot of publishers are requesting card games. As a game design team that is not looking to self-publish, we’ve got to cater to more than just the game players – we need to ensure that the publishers like what they see from a fiscal standpoint as well as the gameplay. So we want to design games that they want to publish. The cheaper a game is to produce, the more likely a publisher is to take a good long look at it.
If, for some reason, we desperately need chits or dice or some other component it’s not a deal breaker as these are self-imposed limits. But we’d like to try to remain true to our limitations as we see a need for a game of this variety in our portfolio.

Working with these constraints for some time now has shown me that there is still complexity in simplicity. Simple games are much more elegant than the bloated systems we sometimes see in some overblown games on the market. The old adage is true, sometimes – less can be more.

It’s an odd fact to try to wrap your mind around but constraints can actually be liberating. Whether it’s trying to keep a theme intact or trying to only use a specific type or number of components, limits allow you to declutter your mind and work only within a space that you’ve defined, free from having to think about anything outside your scope. It seems counter-intuitive to think that limiting creativity is a good thing, but I challenge you to give it a try. Limits can actually force you to be more creative in order to solve problems in very different ways. Having no constraints on your design process can leave you in a position of analysis paralysis where everything seems possible but you are unable to take the game from concept to a playable format. So, if you choose to place constraints upon your game design process, the world may no longer be your oyster. But I’ll bet that you find you come up with some real pearls.

-Sen-Foong Lim

Game Design Tip: Know your Crutches

Game Design CrutchesWhen designing many games it soon becomes obvious that you will develop some crutches, and it would be wise to be aware of them when they happen.

A crutch is something you rely on when you can’t think of a better idea, mostly because it’s easier and seems to solve all your problems.  The biggest challenge with crutches is that since they are usually easy way outs, they’ve probably been done many times before and therefore means you’re not bringing anything new to the table.  It’s also possible that your crutch will merely be a shiny yet temporary coat of paint over your initial challenge you’re having.

For Sen and I, one of our crutches to solve a problem we might have with a game is to introduce a new deck of cards into the game.  Often this comes in the form of an Event Deck.  Early on in its design, Akrotiri (previously known as Santorini) was having some challenges with interaction.  So we immediately went to our crutch and made an event deck.  Now players were forced to draw an event card and this would cause interaction to happen!  Huzzah!  Success right?  Well, no.

In this example, our crutch merely painted over the challenge we were having.  Underneath the Event Deck – there was still minimal interaction in the game. Even though the Event cards made people interact, they still had to play the game with the same mechanics – and those mechanics still lacked interaction.

After more playtesting we tweaked the mechanics and some of the rules (i.e. how many boats can be at the same dock or how other players can affect the market), and we were able to remove the Event Deck entirely (and save it for an expansion 🙂 )

I think in at least half our games we get the idea to add another deck of cards to solve a problem.  By now it’s become an in-joke between us and we use it as a way to brainstorm through the problem but rarely actually make another deck of cards!  Not one of our current games has an event deck.  I’m not against event decks really, but they should only be used once the main mechanics are already solid, and not to cover up a problem.

Another crutch we have is to give our cards multiple uses.  This usually comes from a challenge when we think players aren’t given enough choices in the game.  OK, then let’s give them cards that have two options on them – either use it for this power or that one.  It’s not a bad idea and has been used successfully in some games, but too often we think of this as our solution for improving strategy.

It’s good that we are aware of our crutches so that we can be more objective in understanding if it truly is the best solution to a game design challenge.  For other game designers reading, what are some of your crutches?

-Jay Cormier

When I read the title to this post, I was surprised (pleasantly) that Jay wasn’t regaling you of tales of lawn-chair wrestling. Ah, university days…

Yes. Back on topic – on the subject of these so-called crutches, these are our go-to’s, our fall-backs, if you will, that we use when we can’t figure a way out of a problem. 9 times out of 10, using a crutch is the direct result of not putting in the time to think of a better way, a more efficient way, a cleaner way of getting the desired effect. How do I know this? Because 9 times out of 10, we eliminate the crutch entirely later in the design process as we have figured out a much more elegant and minimal method of achieving the same results.

When examining your crutches, also be aware of the potential downside to anything you build into your game from a publisher’s point of view. 1 more deck of 60 more cards may not seem like much, but you can bet your bottom dollar (both literally and figuratively) that any publisher would choose Game A over Game B if they were the exact same except Game A had less components. Less components = less cost = more margin = more profit. And, really, more profit is better not only for the publisher, but for you as the designer. In speaking to publishers at conventions, Jay and I got a good idea of how many cards can be made per page of stock at European or US dimensions. So we try to keep our card decks equal to or less than what will fit on stock sheets. This not only gives us a working limit, it shows publishers that we know the business somewhat and respect their needs.

Often times, crutches not only add to the cost, but to the complexity of the game, and needlessly so most of the time. This makes the game take more time in total, expands the downtime between turns, and makes the rules take longer to read and harder to understand. From a playtesting perpective, adding more to the game system invariably makes playtesting more difficult as there are that many more variables to account for. This has happened to us in Akrotiri. We added these flags that you could drop on islands, claiming them for your own. Then it took us a while to figure out what those flags did, how they scored, how much it cost, etc. The scoring was a bit more complex than warranted and they really took a lot of time away from the focus of the game. So, in the current version, they’re out.

And the worst offense of all, in my opinion, is that many crutches feel “tacked on” – like they were put there to pay lip service to some singular need and not really merged with the entire ethos of the game. Many experienced playtesters can sense these and if they can, the game playing public at large will be able to. This just makes for a “Frankenstein” of a game – a lumbering hulk of a play experience instead of a sleek, stripped down version where every component, every phase of game play seems necessary to get the full effect. For us, this came into play with Belfort, where we had a Dragon stomping on people’s buildings. It was messy, made us have to make up new rules about warriors and playing defensively instead of flowing the cash to build things (i.e. the main thrust of the game). The game played better, smoother and faster without the Dragon and very few other rules changes had to be made by eliminating the firebreathing beastie. Because of this fact that it could be taken out and nothing really changed to the negative, we knew that it was more tacked on than not. So it was taken out of the final version. Now, that’s not to say that a more well-thought out dragon couldn’t appear, harassing the citizens of Belfort in the future…

Jay listed a few of our big crutches, but one he left for me was the joyful “Secret Goal” card crutch. This one is a bit of a double edged sword, because we use them a lot in our games in order to make the game sneaky/shifty fun. But only in games where that is the original intent and flavour. We sometimes have the bright idea to stuff Secret Goal cards into games to see if that’ll up the fun factor. it’s really hit and miss. For some games, the Goal being secret means that everyone is off playing their own game doing their own thing. For others, it means that no one is willing to act because there’s not enough information on the table. So, Secret Goal cards are both a boon and a bane. If it fits from the beginning – i.e. if your initial game design concept is based around having goals, like spy games, and (for some reason) Jam Slam, then you should be safe. But if you’re looking for adding that certain je ne sais quoi to spice up your game and are thinking “Oooh! I know…let’s give each player a secret goal!”… you may find yourself removing them sooner than later because you have just used a crutch.

-Sen-Foong Lim

Jam Slam rules Requested by Publisher

Just got word that Gamewright is requesting to see the rules to our Jam Slam game.

This is how it happened.  About 4 years ago, Sen and I invented a game called Jungle Jam (which I’ve written about a couple times already in this blog).  It’s been to see a few publishers already, and has undergone some improvements over the years.  Currently it is in the Great Canadian Game Design Competition and is a semi-finalist.  This is when we found out that the name “Jungle Jam” had been taken by another game and was entangled in some sort of legal dispute with a game called Jungle Speed.  Not to be confused with that game, we changed the title of our game to Jam Slam.  We’re expecting to find out any day now if it made it to the finals!

Concurrently to this, I’ve been invited to participate in a group called the Game Artisans of Canada – a group of game designers whose goal is to work together to provide the world better games and help each other out whenever possible.  Rob, one of the members heard that Gamewright was looking for quality submissions of games that were easy to learn and played in less than 30 minutes.  That described our Jam Slam to a tee!

Rob sent them a quick pitch to them about our game and they just expressed interest to see the rules for the game.  If they like the rules for the game then they’ll ask for a prototype in a few weeks.  One step at a time!

Special call out to Rob from Game Artisans of Canada for the heads up and the connection!

-Jay Cormier

There’s a few really cool things about this “day in our lives” as game designers. It shows:

a) That no matter how old a game is, a good design is timeless. Keeping old designs on the back burner, but ready for showing is critical. We usually only keep the latest physical version of a prototype for space reasons (and to limit our confusion!), but always have the older versions as files on the computer if something we did before is beneficial. If you know your game intimately, you should be able to parlay an older design into something good when an opportunity arises. Jay’s use of “Night of the Dragon” concepts for another game is a good example of a game that was sitting doing nothing on the back burner (we actually have a forum called “The Back Burner” where we stick all of our games that are on hiatus) being used for the good of all mankind by being transformed into a game that is forthcoming for the Piece Pack called “Cream of the Crop”.

b) Versatility is an asset, because you never know when a publisher will say “Well, we like what you’ve just shown us, but we’re really interested in a card game…” If all you make is hardcore gamer games, you might miss out on some things. Of course, don’t make kids games if you don’t like making them, but versatility pays off – that’s all I’m saying.

c) Making games that are not tied to a theme, but can be rethemed easily is a good idea if possible. The name change was minor and it doesn’t change a thing at all about the game, but if it had to be done, “Jungle Jam” (now “Jam Slam!”) could be rethemed to almost anything because of it’s simple mechanics. It has a really good base for being used with a licensed character. Imagine Dora or Diego telling you “I need 3 red grapes!”

d) The Chinese (in the case of Jay and me, I’m talking about me) have the same word for crisis and opportunity – Crisi-tunity. Seriously though, it is said that luck is equal parts opportunity and preparedness. In this case, opportunity presented itself through a colleague telling us about Gamewright and we were able to take advantage because we were prepared – we have sell sheets ready, our prototypes usually ready to ship, and our rules done up for blind playing. In this case, because we have the two prototypes of “Jam Slam” out already for the competition as Jay mentioned, we’ll have to make another copy. But usually, we’re on top of that now that we’ve had a few publishers ask us for multiple copies of a game at once, etc.

e) Collaboration extends past Jay and myself. Now that we’re really delving deeper into the game design/production industry, we’re finding gold at every turn! Through our relationship with Tasty Minstrel Games, we worked with Gavan Brown, the graphic designer for “Train of Thought”. That wonderful working relationship turned into Jay being invited to work with the Game Artisans of Canada. They’ve already been immensely helpful in playing our prototypes and giving awesome, no-holds barred feedback for improving our games. And then, as icing on the cake, they’ve been super great with things like this! Opening up doors for us on several levels – they’ve already helped up get consideration from Amigo Spiel (a well-known German publisher) and now GameWright. How awesome is that? I can only hope that Jay and I can reciprocate in kind!

-Sen-Foong Lim

Step 10: Pretty up your Prototype: Stage 2 – Tools and Supplies part 2

Continuing the list of tools and supplies you’ll need to make a good looking prototype!

Cubes: If you go to a school supply store you should be able to buy a tub of 1cm multi-coloured plastic cubes.  This will cost you around $25-$30 and will be your supply of pieces for over a dozen games.  These cubes can be used as character markers, resources or money.  I also found some 2 cm wooden cubes that came in many colours at a dollar store.  Having cubes in two different sizes has helped in numerous games!

Poker Chips: Poker chips (the cheaper small ones) make for great money in a game, and they usually come in different colours too.  You could use cubes if you don’t need cubes for other things, but if we are using cubes to indicate player markers, then it would be confusing to players if cubes were also used for money – even if they were different colours.

Pawns: Pawns seem to be the hardest thing to come by.  Sure there are plenty of places online to buy them, and I really should dive in and buy a bunch in different colours, but they’re hard to find in stores.  It should be pretty obvious that pawns are needed in a lot of games.  Again you could use cubes (and sometimes we do), but if cubes are already representing something else, then pawns are needed.

Stones: Not mandatory at all, but we have found that using these pretty gem stones add some class to a prototype.  Usually we end up just using cubes, but for Rune Masters the stones seemed to make more sense for one component that we called Rune Stones (why would we use cubes for that!?).

Misc pieces: For our 5th or 6th prototype for Santorini we changed how resources were being shipped and resources had to be placed directly onto ships instead of ‘jumping’ from one island to another.  Up until then our ships were just pawns, so we had to make some ships which we did out of gluing some popsicle sticks together.  It was serendipitous that popsicle sticks are also 1cm wide as that allowed us to even create side ridges on our ships so that the 1cm resource cubes could snugly fit in the ships – very cool!

Tools we bought that we thought we needed but we don’t really:

Corner Rounder: We had a couple games where we thought the professional looking rounded edges of some of the components would take it over the top.  It did make some of the prototypes look pretty sweet, but we just didn’t end up using it that much to make it worthwhile.

Die Cutter: We had one game that we needed to make a bunch of similarly shaped tags out of plastic and cutting them by hand seemed ridiculous, so we got a die cutter.  Yeah, not so great a purchase!  It was fine for that one game, but we never used it again.

Once the game is nearing its final stages of life and is ready to be shown to a publisher, then it’s time to make an amazing prototype!  For now it’s important to understand that you will probably still make 5-20 more prototypes of each game before sending it to a Publisher, so no need to spend too much time.

So how far is too far?  Well, I met one game designer who had a party game designed.  The prototyped looked amazing as each of the cards had a printed front and back to them – and they were all professionally laminated.  I was impressed for sure.  We played the game and gave our feedback and the next time I saw him he had his game again – but this time with a whole new prototype.  All the cards were brand new – but they looked as professional as they did before.  I saw him two more times and both times he had another brand new professionally made prototype.  He must have spent a lot of money getting these prototypes made.  I asked him why he spends so much money on getting them made and his answer was that he always thought that the next prototype was going to be the last prototype.  While we all hope that will be the case for each of us, experience tells me (and hopefully that guy by now!) that there is almost always going to be one more prototype to be made!

For our first game we ever made, Top Shelf, Sen and I spent a lot of time making an amazing looking prototype!  We made the board and affixed it to cardboard so that it folded like a real board!  Then we affixed each tile to matte board and even affixed a backing to each tile so that it had the logo for the game on the back!  Then we even ‘sanded’ down the edges of the tiles so they … hmmm…not sure why we did that!  They looked cooler though!  It was too much of course and when we had to make our next prototype of that game it was much simpler.

-Jay Cormier

(and yes, I realize how silly the title of this blog post is: Step 10, Stage 2, Part 2…!)

If anyone has links to share of part/bit suppliers, please share! I’ll look through mine and post later.

But, to respond/add to this post, here are my additions to the list:

STORAGE

I would say another essential bit of gear is a good “bit box” – something to store all your cubes, dice, etc. in an organized, sorted fashion. Jay and I both use things that were probably intended for hardware (nails and screws, etc.) Mine has a handle and 4 trays that pull out, each with customizable sections. I use them to put everything in one neat cube of game design bits.

COLOURING/DRAWING TOOLS

We use Sharpies a lot. Also wood stain markers, acrylic paints, spray primer, pencil crayons, etc. Other “must have” drawing tools include a good metal rule, erasers, pencil sharpeners. Some tools we have used on the rare occasion include number and letter stencils or stamps for use on plastic or wooden bits that we can’t print on. Not everything can be loaded in Tray 1 of the laser printer!

ADHESIVES

Stick glue and spray adhesives are used a lot to make the final prototype. I use that bluetack stuff to cobble pieces together from time to time, to hold tiles to map boards more permanently, etc.

DICE

Self-explanatory – we have a plethora of polyhedra dice at our disposal. Like any good game geeks should. Jay and I don’t use a ton of dice, by nature (Jay has diceaphobia, or maybe he’s a dicist, I’m not sure), but it helps to have some methods of randomly generating numbers around!

BAGS

Helpful for storage as well as randomizing tiles or cubes and keeping them hidden from view. Great for games like “Santorini” to keep resource cubes random or for “Scene of the Crime” to keep the clue tiles hidden from view.

OTHER CUTTING TOOLS

I have a Dremel that I use to cut, grind, and rout wood blocks, mostly – I also have a coping saw for cutting small metal rods/tubes or harder woods and plastics. Both were invaluable for creating “Junkyard”.

OTHER STUFF

Some components are very dependent on the game you’re making – like magnets, push pin flags, etc, – but, like Jay said, we will often find stuff that we think is cool and just grab them in the event that they might come in handy someday! If they come in many different colours (at least the game standards like red/blue/green/yellow), it’s a pretty sure bet, I’ll purchase enough to make a set of 10 of each.

OTHER TOOLS WE HAVE BUT RARELY USE

The only other one that comes to mind is my sticker maker.

ONE MORE THING

re: How many prototypes to make…while you will be making maaaaany versions to get to your final, sometimes, you will need to make a few of the final versions, especially if you have an agent who may wish to show your game to a prospective publisher and leave a prototype with them while the agent sets up the next meeting with another publisher. Note that some agents may not show a game to a second publisheruntil the first publisher has exercised their “right of first refusal”, but it’s always good to have an extra prototype versus having to scramble to make a whole other copy at the last minute. Not that we’ve ever had to do that ourselves…

-Sen-Foong Lim

Step 10: Pretty up your Prototype: Stage 1 – The Computer

Before showing any game to playtesters I like to have as pretty a version of the game as possible.  This is my preference and might not suit all tastes, however I do know that a more polished prototype does improve gameplay.

  1. Players might feel more like they’re in your theme than if it was just text scribbled on cards;
  2. They will be able to recognize certain patterns or types of resources or cards easier because they share the same colour or symbol and
  3. Your playtesters will take you more serious when the prototype looks like you spent more than a half hour on it.

So how nice are we talking?  At this stage we’re still just talking about doing everything yourself.  Don’t take anything to a printer yet!  This stage will require some computer skills and while you don’t have to be an artist, you will need a good eye for layout and presentation.

Corel DrawYou’re going to need some sort of drawing program.  For all of our art we use a program called Corel Draw.  This is a vector based drawing program which means you can resize your images without losing any resolution.  Adobe Illustrator is another fine vector based program – whatever you’re comfortable with is fine.  Even if you don’t have these programs you could use PowerPoint or even Word (but be prepared for a lot of frustration!).  Drawing programs make it easier to line things up and duplicate your efforts easily.  There is a learning curve, but if you plan on becoming a designer then you should get to know at least one drawing program.

We like to add some flavour to our prototypes by adding clipart.  Used poorly though and clipart can be quite ugly, but if you only use it to help tell your story and make your game easier to play, then use clipart for sure!  If we need an elf or a gun or a train then we look it up in our clipart program.  We like to ensure that anything that needs a symbol to help players recognize it has it.  So instead of saying 3 Gold, we’d rather show an image of 3 Gold coins.

These clipart packages are better than just searching online.  Searching online for images you will come across two challenges.

  1. Most of the good clipart is not free.  You will have to either pay for the good stuff, or use clipart with watermarks all over it.
  2. Most of the clipart you find online will not be vector based.  Mostly you’ll find jpgs and gifs.  The challenge with this is that you cannot resize these images very well without them getting blurry – but more importantly, you can’t alter anything about them at all.  For Night of the Dragon I found a great clipart of a Dragon, but I needed it to be red as all the other colours were taken by player pieces and if it was the same colour as a player it would add too much confusion.  Because it was vector based clipart I was easily able to change the colour.  If I had downloaded that from online then I would be stuck with the colour it came in.  Note: If you don’t have a vector based drawing program, then you’re going to have to use jpgs and other compressed images.

Clipart packages can be pretty cheap now and is a very integral part of our game design process.

Coin, clipart example, prototype

One other tip about working with a computer for game design: when you come back to your drawing program to make some tweaks (and oh it will happen…a lot!), I highly recommend to resave the file as a newer version (v1, v2, v3 etc…).  This way if you ever need to revert back to an older version for some reason, you won’t have to waste time recreating something you already created.  This has helped us a lot as we have often had to revert back some aspects of some games as we were making prototypes and playtesting.

-Jay Cormier

As we are finding out working with more and more graphic designers (i.e. people who know more than we do about graphics), one key to strong design is “flow of information” or, put in another way – how well is the information conveyed from the cards or board to the players?

We think a lot about this when we’re doing the graphic design portion of things.

For example, if you look at the cards for “Belfort”, the originals have crappy artwork, but the layout is clean and consistent – especially the costs. They were all made in a specific order so that you could easily scan down the left side of each card and compare costs, even when the cards were fanned out in your hand.

A little forethought goes a long way with this, because it makes the game not only nicer to look at, but easier to play. And one of the biggest detractors in any game – for Jay and I, anyway – is downtime. Whether it be caused by “analysis paralysis” when there is too much information getting all jumbled up thus slowing down your decisions or by players having to look here and there and everywhere to get the information they need, it’s all bad. Good layout of the information on your cards, board, player aids, etc. can take seconds or even minutes off each players turn. And while that doesn’t seem like much – imagine if there are 5 players, each having 6 turns in a game… Simple math will tell you that shaving 30 seconds off each player’s turn will save you 15 minutes of total game time, which can definitely influence how quick some gaming groups are to pick up a game to play. We often make player aids with charts etc. to better consolidate information so people can compare and contrast costs, benefits all in one place.

We also spend a lot of time trying to come up with clear and instantly recognizable iconography for anything that gets used consistently through a given game. Jay’s example of the Gold Piece above illustrates a very common, repetitive icon – I’m sure we’ve used that specific one in over 75% of our prototypes so far, in fact! Icons are so much quicker to scan through than text – which, even though you may be a quick reader, you still have to decode. And if there is a lot of text on a card, it takes that much longer to decode it all and distill what might be important to you this turn. If you can have it presented to you in as few icons as possible + a few choice words to impart the gist of the card, that is infinitely better than having it spelled out for your in pure text, in my opinion.

While a picture can say a thousand words, solid graphic design can speak a thousand languages. With the hope for localization of our games to other countries (Germany, here we come!), we always try to keep any high-cost components (things that would need to be die cut, etc. like decks of cards, boards, etc.) to be as text free as possible to minimize the amount of translation that needs to be done. Whenever possible, we like to use icons in place of text.

SO! While your prototype doesn’t have to have Quentin Hoover level artwork on the cards (He’s one of my favourite MtG artists), well-thought out and strategically planned graphic design can help playtesters to understand and play the game faster and better. And that’s one step closer to getting a prospective publisher to accept a submission from you – the cleaner your game is from the moment they get it in their hands, the better shot you have of taking it all the way to publication.

-Sen-Foong Lim